Texture Ceiling Repairs and Blending
Below is some helpful information on the process to fixing a texture /popcorn ceiling. Weiler Painting specializes in texture matching with popcorn and stucco ceilings of various finishes. If you have any questions or need a professional repair job, don’t hesitate to give me a call. Feel free to send me a few digital pictures of the area and I can usually estimate repairs via email.
For Free consultation
604-825-8337
*** Please note that we have a minimum charge of $300 for texture/ceiling repairs. ***
Diagnosis:
Properly diagnosing your ceiling damage is the first important step in deciding how to properly proceed. Determining the source of the damage to your texturized ceiling is the important first step before moving forward. One of the most common sources of damage to texturized ceiling is water damage from above.
*Moisture Damage
If this is the case there are several things to consider. Is the source of the leak been contained resolved? Is the drywall and insulation above the ceiling been properly dried? Morever, if the moisture has been a longer term problem or a slow leak that wasn’t noticed for a longer period of time there is probably mildew that should be dwelt with prior to repairing the ceiling. Mildew and mold spores can be a serious health concern and should be inspected by a professional and cleaned up respectively.
*Smoke Damage
Another common problem people face with their ceilings is that yellowing effect caused by 2nd hand smoke from years of exposure. This yellow stain will not go away from just spraying your ceiling and there important steps to follow to insure that this stain does not bleed through.
Treatment:
* Spot Repair
If the damage to your textured ceiling is isolated to a small region of the ceiling it can usually be blended in with the other texture. DO NOT waist your money and buy aerosol texture ceiling in a can which are available at most home improvement stores. They will end making a mess and you will be disappointed with the result. It is best to get a professional to come in with a proper texture machine that will blend the texture in with the existing texture. Its still a messy job and the whole are will have to be covered in plastic and sealed off from the rest of the room. However, when done right you can expect 90 percent match to the old texture and it will look like nothing was ever done. Also keep in mind that after the new texture is applied the entire area will have to be painted as the new texture will be a different shade of white than the rest of your ceiling.
*Removing old texture
If you have to or want to remove all of your old texture you must be prepared for a big messy job. The best and most efficient way to remove the old texture is a multi-step process that I will now describe. You first want to cover all your floors and any remaining furniture in the room to protect them. You will than need to spray the old ceiling texture with some warm water to soften the existing texture making it easy to scrape off. Using a large drywall putty knife you can than began scraping off the old texture. If this proves to be difficult retreat the ceiling with some warm water until the old texture is soft and easy to scrape off. Once all the old texture has been scraped off you can clean up the mess and let the ceiling properly dry before re-texturizing.
*Priming and Prep
Make sure to patch any large scratches and marks in the ceiling that may have been caused from scraping off the old ceiling texture. Once the ceiling is patched and lightly sanded you are now ready to apply a primer coat. This can be either rolled or sprayer on and is important to seal in the old drywall as well as any stains that may still be apparent. Brands such as bullseye, Zinsser and Killz are some popular primer sealers and come in water based formulas.
*Equipment Needed
As mentioned earlier you will need a widy putty or taping knife for scraping and patching. You will also need a couple rolls of two inch painters tape, painters plastic to cover the walls, a bag of spray texture and compressor with hopper gun. The spray texture mix can be bought at most major building supply stores and comes in fine, medium or coarse texture. It might be a good idea to do all your prep and primer steps before renting your compressor and hopper to minimize rental costs.
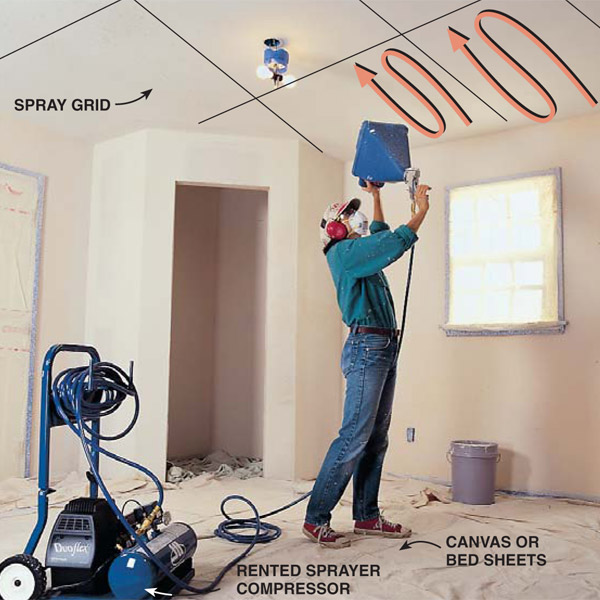
*Texturizing Spray
You will have to mix your powdered texture mix to the right consistency in order to do it right. You will want to bring it to the consistency of a thick pancake mix as this will allow it to stick properly to the ceiling without running and give the desired textured look. Hold the hopper gun 18-24 inches away from the ceiling and systematically spray the entire ceiling from one end to the other. Once done go back over any spots that seem inconsistent or light to even out the look. Once your happy with the look clean out your equipment before it dries.
*Painting the Texture
Once the texture is dry it might be a good idea to paint over the texture finish to seal it in and alter the color of the texture. Some are happy with the unpainted look of textured ceilings but it usually gives a duller look do to the fact that the texture mix is a dull cream color. If you are not happy with the color of the textured ceiling spray and are looking for a more brilliant white or a different color altogether than you will want to spray the ceiling with a quality ceiling paint.